Onboard New Admins
Before activating a new user as an admin, you should have the following in place:
- Created Teams(s) ready to be assigned.
- Created Groups ready to be assigned.
- User profiles structure.
- Projects for the new PIs (if classified):
- Security levels, requirements and certifications.
- Virtual machines configurations and Drives ready to be managed.
- A clear confirmation that the new admins have made an account and are pending activation.
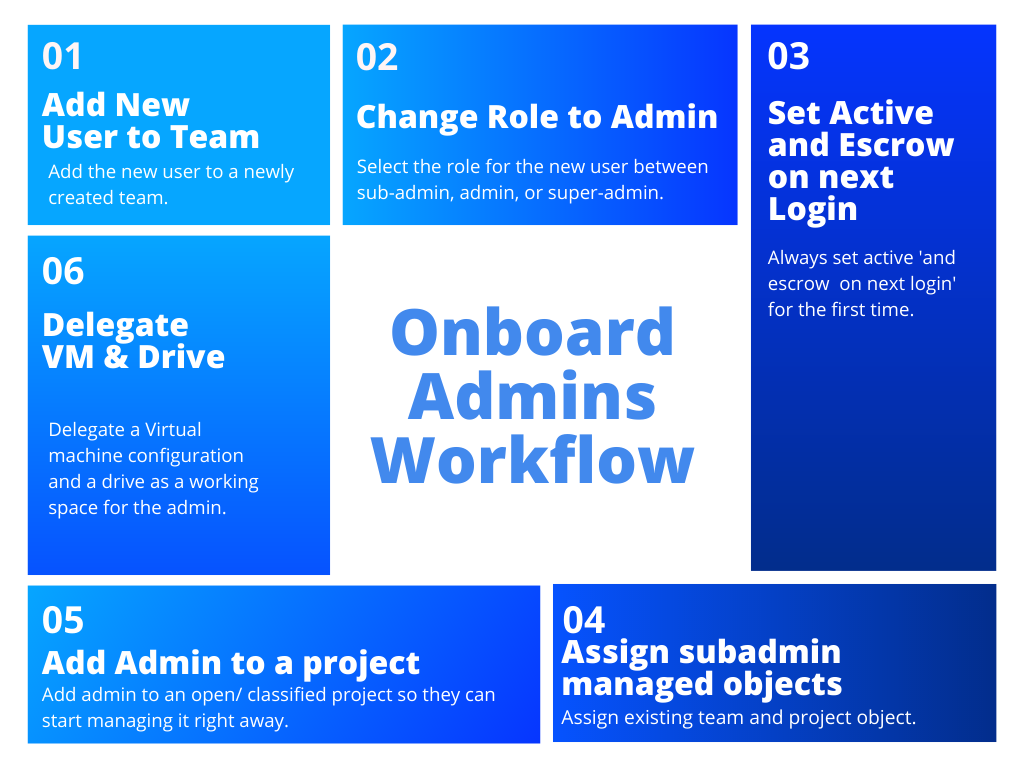
The onboarding process consists of five steps.
Find and Select the Newly Registered User
To find and select a newly created tiCrypt account navigate to in the Users section.
- Select the appropriate user(s) by checking the box in front of them.
By selecting multiple users, you can register them using bulk actions.
1. Add New User to Team
By now you must have a team ready. If you forgot to create a team, follow the instructions from Create a new Team section.
Once all newly registered users are selected:
- Click the
Add to teambutton at the top right corner. - Follow the instructions from add user(s) to team section.
Sub-admins can view and manage team members but they cannot add new members to their teams. Only admins can add new team members.
A team is used for managing quotas in terms of space and data.
Sub-admins can view and manage team members but they cannot add new members to their teams. Only admins can add new team members.
2. Change State to Active and escrow on next login
IMPORTANT
Please make sure you added the user to a team before you activate them.
Once all newly registered users are added to a team:
- Click the
Change Rolebutton at the top right corner. - Follow the instructions from change user role section.
The user(s) is now an admin and can successfully log into tiCrypt!
Admins may be filtered in the Users section under Role column.
3. Change State to Active and escrow on next login
Please make sure you change the role of the user to admin before you activate them.
Once all newly registered users are given the appropriate roles:
- Click the
Change statebutton at the top right corner. - Follow the instructions from change user state section.
4. Assign Subadmin Managed Objects
Once all newly registered users are activated you will delegate a team/project to the sub-admin.
To create a new sub-admin managed object navigate to tab in the Sub-admin Managed Objects section.
- Click the
Create Managed Objectin the top right. - Follow the instructions from change user state section.
5. Add Admin to Project
By now you must have a project ready. If you forgot to create a project, follow the instructions of Create a new Project section.
- Projects are used to restrict who can and who cannot access specific resources.
- We highly recommend adding new admins to projects so they can better learn the system.
Once admins are fully assigned to an team/project object:
- Click the
Add to project(s)button at the top right corner. - Follow the instructions from add users to project section.
- Optionally, to deletegate the whole project, follow the instructions from assign project to sub-admin section.
6. Delegate VM & Drive
By now you should have a Virtual Machine configuration and a Drive attached to it. If you forgot to create a virtual machine configuration or a drive, follow the instructions to Create a VM configuration and Create a drive sections.
Once admins are optionally part of a project, you will add them to a VM configuration.
To add users to a VM configuration navigate to tab, in the Virtual Machines section.
- Select the virtual machine you would like to add users to.
- Click the
User Managementcard on the right panel. - Click the
Add User(s)button at the top panel. - Follow the instructions from add users to VM configuration section.
Additional Actions
7. Certify Admin for Project or Virtual Machine
When users with the admin role are not able to access files or virtual machines tagged by a project, they are not part of that project.
In this case, your project should already have Security Levels with each having Security Requirements based on User certifications that provide proof for the requirements.
If you forgot to create security levels, requirements and certifications, follow the instructions to create new security levels , new security requirements and certify users certifications sections.
- Click the
Open Overlaybutton at the top right corner. - Follow the instructions from certify user for a certification section.
You must add the correct certifications to qualify the user for the security level of the respective tagged project.
More security levels require more certifications from project members.
You should verify from time to time if new security requirements are added or if security certifications have expired.